Connecting your Nintendo Switch to a computer can be done in a number of different ways. Continue reading if you want to learn how to do it. This article will outline the steps you must take in order to play Nintendo Switch games and use its controllers with a computer.
The best option is to purchase a product, such as an Egato HD60 capture card, which will act as a dock to connect your laptop to a Nintendo Switch, enabling you to play games without experiencing lag or connectivity issues.
Table of Contents
How to Use Your Nintendo Switch With a Windows Or a Mac

You’ll need to dock your Nintendo Switch and launch a special setup procedure in order to use it with any laptop or computer. Here’s what you need to do:
- Disconnect any Nintendo Switch cables from your TV if you have any.
- With the Egato HDMI capture card, connect the HDMI cable.
- You need to launch the Game Capture HD application on your laptop or computer.
- Turn on the Nintendo Switch and press Home on one of the controllers.
- Connect your laptop to an Egato device. The Nintendo Switch home screen will now appear on the screen of your device.
Since all capture card devices operate according to the same principles, these steps apply to any device on the market that uses a capture card.
Use a Capture Card
Let’s say you want to view the video and audio output from your Switch on a laptop or desktop computer. The Elgato HD60 S+, which replaces the Elgato Game Capture HD60 S and offers numerous significant upgrades over the old model, can be used as a USB video capture device in that situation.
The Switch’s sound and video can be transferred to your computer with this capture card. You won’t experience any lag even if you want to record video from your Switch if your computer satisfies the card’s specifications. Although Macs are officially supported, Microsoft Windows systems perform best with the capture card’s software.
You can also connect your Playstation 4, Playstation 5, Xbox One, or Xbox Series console to the capture device and play while capturing gameplay without experiencing any lag. It does take a few clicks to get it all setup and switch to full-screen mode in the Elgato
Use a USB Cable to Transfer Photos and Videos
With Switch System Software 11.0.0, you can link the Switch to your computer by plugging a USB-C cable into a USB port on your PC. A simple USB drive representation of the Switch will appear on your computer. Just head to:
System Settings > Data Management > Manage Screenshots and Videos > Copy to a Computer via USB Connection
If you see a “Connected to the Computer” message, you can open the Change the operating system’s drive. When done, remember to select Disconnect.
Use Smart Device Transfer for Photos and Videos
Using the Smart Device transfer feature, you can quickly transfer videos and photos from your Switch to your PC. Once these media are on your mobile device, you can transfer them to your PC using the same methods you would use to transfer any other file from your smartphone to a computer. One video and ten photos can only be shared at once, which is the only restriction.
This technique functions by momentarily converting your Switch into a web server. Here’s how to use the feature:
- From the Switch Home screen, choose the Album icon.
- Choose the image or video that you want to transfer.
- Select Posting and Editing, then choose Send to Smart Device.
- You have the option of sending items singly or in bulk. Determine which choice best meets your needs.
- When required, the Switch will show a QR code that can be scanned with a smartphone camera to establish a connection to the Wi-Fi hotspot.
- The Switch will show a new QR code after being connected. By scanning this code, a web page containing your content will be opened.
- Using your browser, save them to your smart device.
Nintendo came up with a clever solution, but not everyone will find it useful. The good news is that you can more easily access the data from the SD card.
Use An SD Card Reader
Simply remove the SD card from its slot and use a USB SD card adapter or an integrated SD card slot to view the contents of the card if you want to copy all of your content from your Switch to your PC.
Before removing the SD card, make sure your Switch is turned off. If you don’t know what you’re doing, you shouldn’t change the data on any SD card. In the event that your current SD card develops a problem, you can backup its contents, but you cannot use that backup on another console.
You can use your PC to copy the contents over to a larger SD card if you want to upgrade, and it will function without a hitch.
Play the PC Version of the Switch Game Instead
There are many PC ports of Switch games from third parties. This means that you frequently have the choice of purchasing the game on your PC if you want to play the same game on it. You will find that the PC version is less expensive than the Switch and other consoles, which is unfortunate because it means buying the game twice.
Naturally, if you want to keep using the same save files that are currently on your Switch, this is useless. Sadly, only a select few important games on the Switch support cloud syncing with their PC counterparts. Cross-progression features are available in games like Divinity Original Sin 2, The Witcher 3, and Diablo II Resurrected, for instance.
Consider purchasing a Steam Deck or comparable handheld PC running Steam or any other PC gaming clients that support cloud-sync if you want universal cross-progression between your PC and handheld.
Use a Switch Emulator
Using a Switch emulator is another way to run a Switch game on your PC. You can play those games on your computer by using this software to simulate the Switches’ hardware. You can even run those Switch games at higher resolutions and frame rates on a fast enough computer than the Switch can.
Even moving your save files between the Switch and an emulator is possible. The experience isn’t polished or user-friendly, though. The main issue with the emulator option is that it might be prohibited in your country.
You must possess a legitimate copy of the game you wish to play, but you should always double-check your country’s laws to see if the emulator you purchased is acceptable there.
Connect Joy-Cons Or the Switch Pro Controller to Your PC
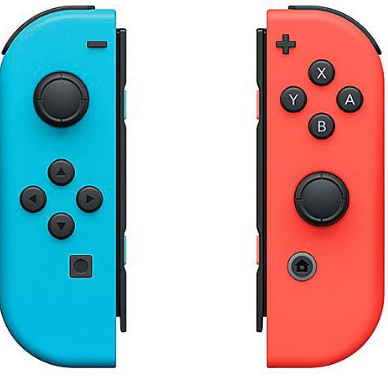
Instead of your entire Switch, you might be attempting to connect your Joy-Cons or Pro Controller to your PC. Nintendo controllers are simple to connect to your computer if that’s all you have (or you’re playing Nintendo games through an emulator), even though you’re better off using an Xbox controller or even a Playstation controller with PC games.
Your PC will recognize each Joy-Con controller as a separate device if you’re using them. Modern games won’t run at all with this setup, but it’s fine if you want to play some old games on your PC in 2-player mode. One choice is to manually assign each Joy-Con’s control scheme in the game, but most games will not support this.
With the help of the BetterJoy app, you can combine your Joy-Cons into a single controller that is compatible with all Xbox controller-compatible games. The Pro controller receives a similar level of compatibility from BetterJoy.
You must purchase a Bluetooth adapter before connecting the Joy-Cons if your computer is Bluetooth-deficient. They don’t even have any ports to plug a USB cable into.
The sync button on each Joy-Con (or Pro controller) must be held down until the lights begin to flash.
Then on your PC, look under Bluetooth devices for the controller.
With the Pro Controller, all you need to do is use a wired USB connection to plug it into your computer, and it will immediately begin to function.
Alternative Option: Use a Portable Monitor
Another option is to use a portable monitor if all you want is a large screen to connect your Switch to and you don’t need the portability of a laptop. These have HDMI input ports, built-in speakers, and can be powered by USB. The USB-C cable included with the Switch Pro Controller can be used.
If you travel with your laptop, these screens are small enough to fit in the same laptop bag. In addition, you can use the portable monitor as a second screen for your laptop or desktop computer when not using it for your Switch. Therefore, it is a legitimate expense!
How to Use the Switch Controllers With a Computer
Only Bluetooth connectivity is used to connect the Switch controllers to the computer. You can do it by simply following these steps:
- your computer on.
- Click Start > Settings > Devices.
- Then, toggle Bluetooth to On; it’s at the top of the Devices screen.
- The Nintendo Switch’s controllers must be disconnected.
- Hold the Sync button on the controllers until it starts flashing.
- Tap on Add Bluetooth or Other Device.
- When you see Joy-Con(R) and Joy-Con(L), click on Pair and Done.
- You must pair the controllers with your computer as soon as you see them on your device list.
- When they are connected, the computer will recognize them as individual controllers.
You’ll need to synchronize them to function as a single device if you want to use them as a single controller. This is the challenging part because it will require using other programs and take a long time to complete.
However, if you need to use them together, you can download a program called Better Joy that will enable you to use two Joy-Cons in place of one.
How to Use the Switch Pro Controller on a Windows PC
You can use your Nintendo Switch Pro controller with a PC, but the process might be challenging. You have the option of using a wired or wireless connection when connecting the Pro controller. While the wireless connection is more complicated, the wired connection is very simple.
Here’s how you can connect the Pro controller using cables:
- Connect the cable to both the controller and your computer.
- Windows will automatically detect a new device as a Pro Controller.
- Up until everything is prepared for gaming, keep setting things up.
Should you want to use a wireless connection, this is what you should do:
- The synchronization button should be pressed and held while your Pro controller is turned on. It can be found on the controller’s top.
- The controller can be found by other devices when the indicator light begins to flash.
- Right-click the Bluetooth icon in the system menu by opening it.
- In the Bluetooth & other devices menu, click on Add Bluetooth or other device.
- On the list of available devices, you’ll see Pro Controller; click on it.
- Then, in the pop-up, click Pair.
You might need to purchase a more powerful Bluetooth USB adapter if you start having Bluetooth issues. You can play games uninterrupted because it will guarantee a more stable connection.
How to Use the Switch Pro Controller on a Mac
Many gamers who enjoy playing games on their computers and laptops were delighted when Nintendo decided to add Bluetooth support for the Switch Pro controller. It is now synchronizable and usable on a variety of devices.
Here’s how you can connect your controller to Mac:
- Open your Mac and click on the Bluetooth icon to open Bluetooth Preferences.
- Hold the sync button on the Pro controller next to the charging port.
- When you see Pro Controller on the list of your computer’s new devices, click Connect.
- You can check the status of the controller once the devices are paired.
- You can use your connected devices now that they are connected.
FAQs
How Do I Connect a Nintendo Switch to a TV?
Open the back of the Nintendo Switch dock and connect the HDMI cable and AC adapter to connect a Nintendo Switch to a TV. The HDMI cable should be plugged into your TV, and the other ends of the AC adapter should be placed in a wall outlet. Place your Nintendo Switch in the dock, remove the Joy-Cons, and then turn it on.
How Do I Connect a Nintendo Switch to Hotel Wi-Fi?
First, ask the front desk for the Wi-Fi password. Open the Switch’s Settings and select Internet > Internet Settings. Input your login information when prompted, then select the hotel’s network. The hotel’s Wi-Fi will be available to your Nintendo Switch once you’ve entered the password.
How Do I Reset a Nintendo Switch?
To reset a Nintendo Switch, press and hold the power button until the console resets, then release and press the power button again. To reset your Nintendo Switch without losing game saves, turn it off, press and hold the volume up and volume down buttons, and press the power button. When Maintenance Mode loads, choose Initialize Console Without Deleting Save Data.